
JavaCupcake Note: This is a re-post of a blog from Nicole at Baking Bites! I used this technique to make the White Velvet Raspberry filled cupcakes. Be sure to check out all the other delicious creations Baking Bites is Nicole is making on her blog!
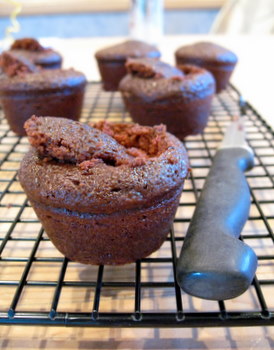
“Filling in the cupcake” should be an expression in the same vein as “icing on the cake.” Both are added bonuses that you don’t need, but can take a treat to the next level. Icing is a bit more common than filling and since it may not be something you do every time you bake, I put together this photo tutorial to give you an edge the next time you give it a try - like if you decide to go for a batch of Devil’s Food Cupcakes with Vanilla Cream Filling, for instance.
There are several ways to fill a cupcake with jam, cream or some other type of filling. The easiest involves cutting the cupcake in half and spreading it with the filling, treating the cupcake as though it were a tiny layer cake. It is effective, but doesn’t give you the classic “look” of filled cupcake. A slightly more sophisticated way is to put your filling into a pastry bag fitted with a metal or plastic tip, poke the tip into the center of the cake, and squeeze in a bit of filling. This method is quick, but tends to leave only a small amount of filling in place.
My favorite way - and, in my opinion, the best way - is the method I used for the Devil’s Food Cupcakes. It gives you the maximum amount of filling and the best overall look for the cupcake. All you need is a paring knife, or other small, sharp knife with a narrow blade, to begin. Insert the knife into a cooled cupcake at an angle, halfway between the center and the outside edge.
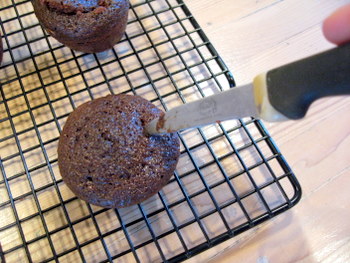
The exact angle isn’t crucial, but it should be around 45 deg., and the knife should go into the cake about 1″. The idea here is to cut out a circular cone of cake.


Filling should be added using a pastry bag or (my favorite) a ziploc bag with the corner cut off. There is no need to use a pastry tip to fill the cupcakes; a medium-sized opening in either type of bag will make filling the cakes a breeze.

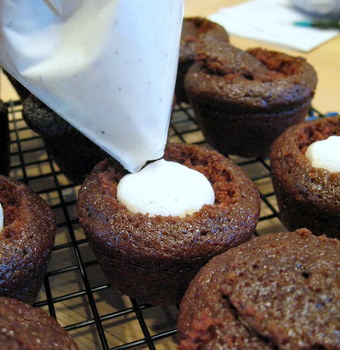
Once the filling is in place, just pop the flat circle of cake back into place and continue to frost as you would with any other cupcake. You can see what the finished cake, sliced in half to reveal the cream filling, looks like here.
There are several ways to fill a cupcake with jam, cream or some other type of filling. The easiest involves cutting the cupcake in half and spreading it with the filling, treating the cupcake as though it were a tiny layer cake. It is effective, but doesn’t give you the classic “look” of filled cupcake. A slightly more sophisticated way is to put your filling into a pastry bag fitted with a metal or plastic tip, poke the tip into the center of the cake, and squeeze in a bit of filling. This method is quick, but tends to leave only a small amount of filling in place.
My favorite way - and, in my opinion, the best way - is the method I used for the Devil’s Food Cupcakes. It gives you the maximum amount of filling and the best overall look for the cupcake. All you need is a paring knife, or other small, sharp knife with a narrow blade, to begin. Insert the knife into a cooled cupcake at an angle, halfway between the center and the outside edge.
The exact angle isn’t crucial, but it should be around 45 deg., and the knife should go into the cake about 1″. The idea here is to cut out a circular cone of cake.
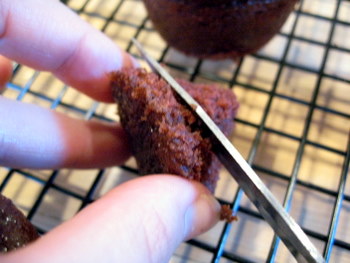
Once you have your cone of cake, remove it and slice off the pointy end of the cone, leaving just the circular base (which was the very top of the cupcake). The filling will be put in the hole once filled by the cake cone, and the circular piece will be used as a plug to seal the filling in.
Filling should be added using a pastry bag or (my favorite) a ziploc bag with the corner cut off. There is no need to use a pastry tip to fill the cupcakes; a medium-sized opening in either type of bag will make filling the cakes a breeze.
Once the filling is in place, just pop the flat circle of cake back into place and continue to frost as you would with any other cupcake. You can see what the finished cake, sliced in half to reveal the cream filling, looks like here.

1 comments. Add yours here!:
I've always wanted to put filling in a cupcake, but I've been too scared. This post has given me the push I need to try it. Thanks!
Post a Comment